


Polka Dot Nails
Polka Dot Nails - Ideas and Inspiration
Polka dot nails are one of the most fun, creative, and timeless nail art trends. From the 1920s to today, polka dots have always been associated with playful charm, elegance, and bold design. Whether you're going for a retro look or a modern twist, polka dot nails offer an excellent way to add a touch of creativity to your manicure.
1. Simple and Elegant Polka Dots
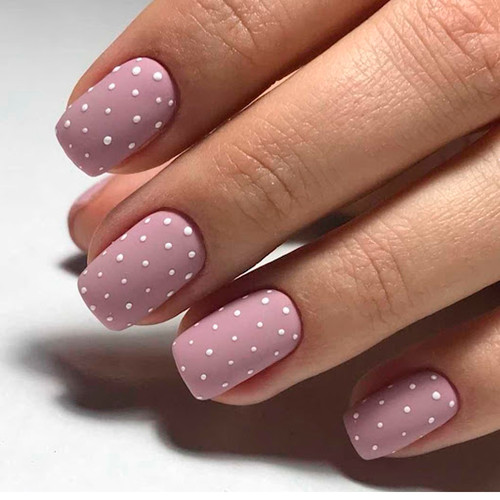
Sometimes, the simplest designs are the most effective. For those who enjoy understated elegance, small, uniform polka dots in a neutral or pastel color are an excellent choice. Light pink or soft blue polka dots on a nude base create a gentle, feminine aesthetic, perfect for a day at the office or a casual outing. This minimalist design offers just the right amount of personality without being too over-the-top.
2. Bold and Contrasting Dots
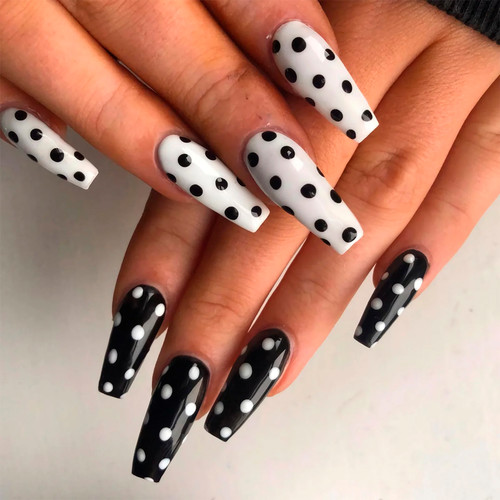
If you're after something more dramatic, bold polka dots on a contrasting background can make a statement. Consider pairing black and white for a timeless, classic look. Or, go even bolder with vibrant hues like neon yellow on a deep blue or bright red on a black base. This type of design can instantly elevate your manicure, giving it a fun, modern edge.
3. Polka Dots with a Twist
For those looking for a creative twist on the traditional polka dot design, consider experimenting with varying sizes and shapes. Larger dots mixed with smaller ones can add depth and interest to your nails. Alternatively, try a polka dot design with other elements like stripes, geometric shapes, or gradient colors to create a unique and dynamic look.
4. Retro-Inspired Polka Dots
Polka dots are inherently nostalgic and have a strong connection to retro fashion. Channel a 1950s-inspired look by using bold red and white or black and white combinations. This look pairs wonderfully with vintage-style clothing, making it perfect for a themed event or a day out with a retro vibe.
5. Seasonal Polka Dots
Polka dots aren't just for casual wear—they can be adapted to any season. For spring and summer, pastel-colored dots on a soft pink, light lavender, or mint green background can create a fresh and airy look. For autumn and winter, opt for richer colors like deep burgundy, forest green, or navy, and pair them with metallic gold or silver dots to add some festive sparkle.
Polka Dot Nail Art - Step by Step with Tufishop
Creating a polka dot design is simpler than it looks, and with the right tools, you can achieve a flawless finish. Follow this step-by-step guide to get perfectly dotty nails:
Step 1: Gather Your Supplies
Before you begin, make sure you have the necessary tools to create the design. Here’s what you’ll need:
- Two or more nail polish colors (base color and polka dot color)
- A dotting tool (or a bobby pin for a DIY option)
- A base coat
- A top coat
- Nail polish remover (for cleaning up mistakes)
- Cotton pads or swabs
- A clean-up brush (optional)
Step 2: Prepare Your Nails
Start by cleaning and prepping your nails. Remove any old nail polish and shape your nails to your desired length. Push back your cuticles gently and apply a base coat to protect your nails from staining and ensure better adherence of the polish.
Step 3: Apply the Base Color
Once your base coat has dried, apply your chosen base color. This could be a nude, pastel, or bold color, depending on your style. Apply two coats of the base color to get an even, smooth finish. Allow it to dry completely before moving on to the next step.
Step 4: Add the Polka Dots
Now, it’s time for the fun part! Using a dotting tool (or a bobby pin if you don’t have one), dip it into the nail polish color you’ve chosen for the polka dots. Gently press the tool onto your nails to create small, evenly spaced dots. You can place the dots in a regular pattern or scatter them randomly for a more abstract design. You may need to dip the tool back into the polish to continue making dots.
Step 5: Clean Up
After the dots are in place, clean up any excess polish around your nails using a small clean-up brush dipped in nail polish remover. This will give your manicure a polished and professional appearance.
Step 6: Apply a Top Coat
To finish your design and make it last longer, apply a top coat to seal in the polka dots and add shine. This also helps prevent the design from chipping. If you prefer a matte finish, you can choose a matte top coat instead of a glossy one.
Step 7: Let It Dry
Allow your nails to dry completely to avoid smudging the design. Take your time and let the layers set to ensure a perfect and durable finish.

Nail Dot Design - Trendy Polka Dot Styles
Polka dot nails are highly customizable, allowing you to experiment with various styles and techniques. From subtle designs to bold patterns, the possibilities are endless. Here are a few trendy styles to inspire your next manicure:
1. Minimalist Polka Dots
A minimalist approach to polka dots is all about simplicity. Use small, evenly spaced dots in a single color, such as white on a nude base or black on a pastel color. This design is clean, elegant, and perfect for both work and casual events. You can create a uniform design or add a few dots only to the tips or bottom of your nails for a fresh twist.
2. Half-Moon Polka Dots
Combine two classic nail art trends: the half-moon manicure and polka dots. To create this look, paint a crescent shape at the base of your nails with a solid color, and fill in the rest of the nail with dots. This design gives your nails a chic, sophisticated feel while adding the fun element of polka dots.
3. Gradient Polka Dots
For a playful and vibrant look, try creating a gradient effect with your polka dots. Start with larger dots at the base of your nail, and as you move towards the tip, make the dots progressively smaller. This creates a beautiful fading effect that looks dynamic and stylish.
4. Colorful Polka Dots
If you're feeling adventurous, use multiple bright colors for your polka dots. Neon shades, like pink, yellow, and blue, look amazing when placed against a black or white base. This fun and bold design is perfect for a summer manicure or a festival look.
5. Polka Dots with Stripes
Another trendy design is mixing polka dots with stripes. Paint one or two nails with bold stripes and add dots on the others. The combination of lines and dots gives your nails a geometric, modern appearance that’s sure to stand out.
6. Vintage-Inspired Polka Dots
For a retro look, use larger polka dots in classic color combinations like red and white, or black and white. This style is reminiscent of vintage fashions and is perfect for any pin-up style lovers. A red base with white dots is a bold, timeless choice that works for both casual and formal settings.
7. Gold Accents with Polka Dots
Add a little luxury to your polka dot nails by incorporating gold accents. You can create gold polka dots on a dark-colored base or add gold stripes alongside your dots. The gold detail elevates the design, making it perfect for special occasions or a night out.
Polka dot nails offer endless creative possibilities and are a timeless design choice for any occasion. Whether you prefer minimalist dots or bold, colorful patterns, this design is versatile and fun to wear. By following the simple steps outlined above, you can easily create a stunning and unique manicure that expresses your personal style. With the right tools and a little practice, you can master the art of polka dot nails and enjoy a flawless, chic manicure every time.


