


Flower Nail Designs
Flower Nail Art Inspiration - Choose Your Style
When it comes to flower nail art, the options are endless. You can opt for a single flower accent on one nail, or you can go all out and create a garden of flowers across all your nails. Floral nail designs can be done using a variety of techniques, including freehand painting, stamping, and even using 3D nail art elements.
Floral designs can also be paired with other patterns such as geometric shapes, ombre effects, or metallic accents to add dimension and depth to the look. Flowers are so versatile that they can be easily customized to suit your personal style, whether you prefer minimalistic designs or bold, colorful blooms.
Delicate Flower Nails - Ideas and Trends
When it comes to delicate flower nails, the goal is often to create a design that is subtle, elegant, and feminine. Here are some of the most popular and trending ideas for delicate flower nails:1. Pastel Flowers
Pastel flowers are perfect for a soft and romantic look. Light shades like lavender, baby pink, peach, and mint green make excellent choices for a delicate floral design. These colors are subtle and calming, and they work well for spring and summer months. You can opt for a full pastel design with flowers scattered across all your nails, or you can create an accent nail with a single pastel flower for a minimalistic look.
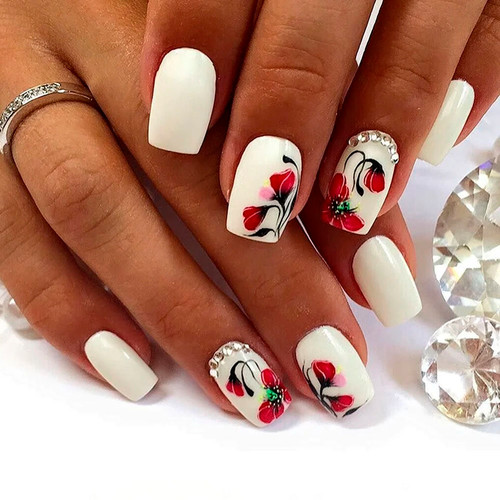
2. White Floral Art
White flowers on nails are classic and clean, adding a touch of elegance without being overpowering. White flower nails are perfect for brides, special occasions, or everyday wear. White floral designs look especially beautiful on nude or soft pink nails, providing a refined and graceful look. Try using fine details like thin lines or dots to add texture and depth to your white flower nails.
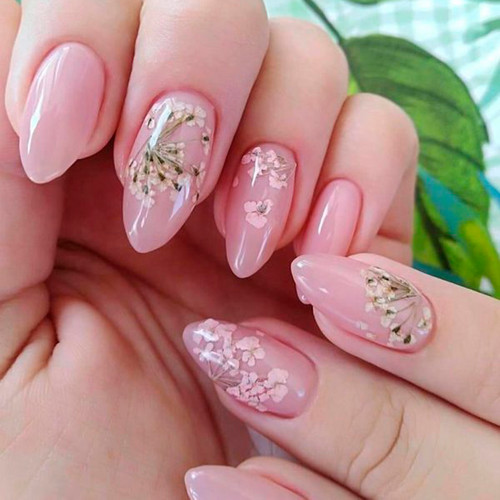
3. Transparent Flower Nails
Another delicate trend is transparent flower nails. This design features a light, airy background with minimalistic floral patterns painted in subtle tones. The effect is soft and dreamy, and it works well for both casual and formal occasions. Transparent flower nails often combine with other minimalistic elements like thin gold lines or dots, adding a bit of sparkle without being too flashy.
4. Watercolor Flowers
Watercolor flower nails are another popular design that has a soft, almost ethereal quality. These designs are created by blending colors gently to create a “watercolor” effect. Watercolor flowers are perfect for creating a soft gradient of colors, mimicking the way watercolor paints blend together. These designs look natural and organic, and they can be customized with any color palette to match your personal style.
5. Small Detailed Flowers
For those who love subtlety, small detailed flowers are a great option. These tiny blooms are usually done with fine lines and soft shades, providing a delicate touch to your nails. A single flower accent or a few small flowers scattered on one or two nails can create an understated, feminine look. You can also add metallic accents to the petals or center of the flowers for a little extra shine.
How to Do Floral Nail Art - Step-by-Step Tips
Step 1: Gather Your Supplies
Before starting your floral nail art, make sure you have all the necessary tools and supplies. Here's what you'll need:
- Base coat
- Nail polish in various colors (for the flowers and background)
- Nail art brushes (fine-tipped for detail work)
- Dotting tools (for making flower centers or dots)
- Nail tape or stickers (optional, for clean lines)
- Top coat to seal the design
The first step to any great nail design is proper preparation. Start by removing any old nail polish and gently filing your nails into your desired shape. Push back your cuticles and buff the surface of your nails if needed. Apply a base coat to protect your nails and create a smooth surface for the nail polish.
Step 3: Choose Your Color Scheme
Decide on the colors for your flowers. You can go for a monochromatic look with one color for the flowers, or you can mix multiple colors to create a more vibrant and lively design. For delicate floral designs, pastel colors or soft tones like pink, lavender, peach, or mint work best. You’ll also need a contrasting color for the background of your nails (nude, white, light pink, or even transparent).
Step 4: Create the Flower Design
There are different ways to create floral designs on your nails, depending on your skill level and preferences. Here are a few popular methods:
Freehand Painting: Use a fine-tipped nail art brush to paint small flowers on your nails. Start with the outline of the flower, then add petals, and finish with the center. For a more detailed look, you can add layers of colors to create depth.
Dotting Tool: A dotting tool is perfect for making simple flowers. Dip the tool in the nail polish and place dots in a circular pattern to form the petals. You can use a different color for the center of the flower. This method is great for beginners and results in a fun and easy flower design.
Stamping: Nail stamping is a technique where you use a stamping plate and a scraper to transfer a pre-designed floral image onto your nails. This method is quick and easy, perfect for creating intricate designs without having to hand-paint everything.
Step 5: Add Details and Accents
Once the flowers are painted, you can add small details like leaves, vines, or dots to enhance the design. You can also add some sparkle by using glitter or metallic polish on the flower petals or in the center. This adds dimension and a touch of glam to the design.
Step 6: Apply a Top Coat
To protect your design and ensure that it lasts, always finish your floral nails with a top coat. This will seal in your artwork, making it shiny and long-lasting. If you want a matte finish, you can use a matte top coat instead. Don't forget to cap the tips of your nails with the top coat to prevent chipping.
Step 7: Clean Up
After your nails are dry, you may want to clean up any excess polish around your cuticles using a small brush dipped in nail polish remover. This step helps to define the edges of your design and gives your nails a professional, polished look.
Floral nail art is a wonderful way to add a touch of creativity and femininity to your nails. Whether you choose delicate designs or bold, colorful blooms, flowers on nails are a timeless trend that can be tailored to suit any style and occasion. From pastel flowers for a soft, romantic look to intricate floral patterns for a more dramatic effect, the possibilities are endless. By following these simple steps, you can easily create your own floral nail art and make your hands look beautiful and elegant every day.


